Tag: Food

  • KRINOS Taste of the Danforth

    Krinos Taste of the Danforth - image from toronto.com/tasteofthedanforthBoy, am I ever looking forward to this weekend! Food, food and more food! Starting tomorrow until Sunday, August 12th part of Danforth Ave. will be closed to traffic and open to pedestrians who will be able to access a wide array of food, music, culture, activities and entertainment for the 14th annual Krinos Taste of the Danforth festival. Alex Alexakis, the Vice Predient of Canadian Operations stated:

    The seed for this festival was planted 14 years ago when local businesses were looking for a way to attract attention to the community – there were only a few tables of food and some local musicians. Now it’s the largest Greek festival outside of Greece, attracting over one million visitors from around the world.

    That’s a lot of people. Everything Greek is sure to be here, and there’s plenty to do for the entire family. I have to make sure to hit the Danforth opening day of the festival and grab some lokoumades (sooooo yummy!) I may even attempt to climb the Mount Olympus Climbing Wall. If you haven’t been to Taste, make sure you reach this weekend. Don’t forget your toga (yes, they’re even having a Dress As An Ancient Greek Relay)!

  • Recipe: How To Make Sushi

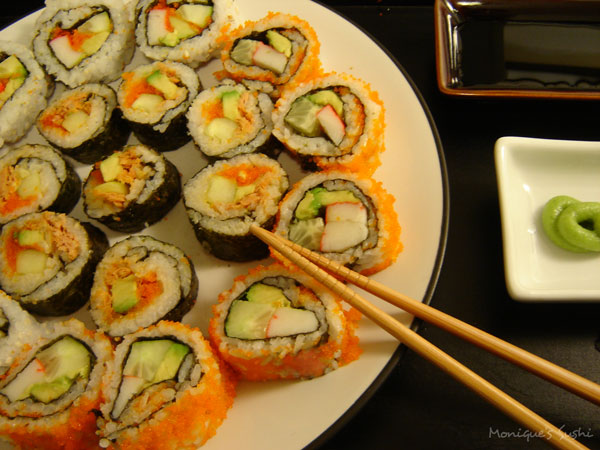
    I love East Asian food. I love it so much that it’s possible that was probably Asian in a past life. I made some sushi the other night, and let me tell you that for a Black girl I make it pretty damn well. ;) A hit at all my dinner parties that I throw at home, it’s a shame that it took me so long to realize that sushi (at least the basic type) can be super-easy to make myself. If you’re craving some Japanese cuisine, there’s no reason to go out to the semi-expensive sushi bar, because you can create your own filling rolls right in the comfort of your own home–for a fraction of the price. Sure it may be a bit tricky at first, but once you get the hang of it, you’ll be tempted to start your own all-you-can-eat sushi restaurant (okay, perhaps that’s a little far fetched, but you get the point).

    Now there’s a myriad of types of sushi, but this is a recipe for basic, cheap & simple Monique-Rolls ;) aka California rolls and Tuna rolls. For a short course on some of the terms and a background on Japanese sushi visit the Wikipedia article on sushi.

    Here’s a list of things that you’ll need before you begin:

    • A Bamboo Rolling Mat
      Also known as a makisu. Can be found at virtually all Asian grocery stores and at some regular grocery chains
    • A Rice Paddle
      Also known as a shamoji. I purchased a bamboo one at an Asian grocery store for about $1.30… you can try your local dollar store
    • A Large Bowl
      Preferably glass or heavy plastic… stay away from metal
    • A Cutting Board

    Ingredients:
    (all the prices posted are based on my purchases from the local Asian grocery supermarket)

    • Nori
      This is the seaweed wrappers used in maki. I usually use Marufuji Yaki-Sushi Nori because of it’s high quality. Just make sure the nori sheets you buy is thick, smooth, and doesn’t have any holes. (approx $2.50 for a pack of 10 sheets)
    • Sushi Rice or Calrose Rice
      The key part of any sushi meal. To make 4 sushi rolls (which could then be cut into about 30 individual pieces), I use 2 cups of rice. When cooking, a 1:1 ratio should be used in order for your medium-grain rice to come out well.
      (about $3 for a 2kg package)
    • Imitation Crab or Canned Tuna
    • Fresh Vegetables (cucumber, carrots, avacado)
    • Fish Roe
      There are several types of fish roe you can use for maki filling/coating, such as masago, ikura, kazunoko and tobiko. I use masago. ($3 for a small container)
    • Rice Vinegar
      Very important when making sushi. I always purchase Marukan’s Seasoned Rice Vinegar. They also sell the unseasoned kind (which you’d have to add a bit of salt and sugar to for sushi). Seasoned rice vinegar can also be used as a marinade for meat, fish and veggies. I use about a couple tablespoons for each cup of rice. ($3)
    • Soy Sauce
      There are several types available. I’m quite fond of Kikkoman’s Sushi & Shashimi Soy Sauce because it’s a bit sweeter and milder than the original. ($2-3)
    • Wasabi (optional)
      A piquant paste made from the grated root of the wasabi plant. According to Wikipedia, it has anti-microbial properties and may reduce the risk of food poisoning. I mix a bit of S&B’s brand of wasabi in with my soy sauce for dipping. ($2.50/tube)
    • Gari (optional)
      Sweet, picked ginger eaten to cleanse the palate and help with digestion. (I never purchased this before, but the bottle is about $4-5)

    Instructions:

    1. Wash The Rice
      This is very important. Make sure you wash it several times until the water runs fairly clear after while you drain it.
    2. Cook The Rice
      I use a rice cooker, because it does the job so well. But if you don’t have one, a decent pot with a lid will do. Cook the rice for about 15-20 minutes on low heat with the lid covered.
    3. Prepare Your Fillings
      Now that you have some free time, you can prepare your fillings for your maki rolls. Cut an English cucumber in half lengthwise, then down the middle again so that you get the strips small enough to fit within the maki rolls. Sometimes it can be chopped finer. If you want to add some carrots to your California Rolls, go right ahead. In the past I’ve used baby carrots because they’re easier to slice finely. To prevent your avocado from turning brown (due to oxidation), after peeling and slicing wrap them tightly in plastic wrap. You can also spritz some lemon juice on them to keep them fresh. Peeling and cutting an avacado can be tricky… the avocado peeler is your friend. Masago freezes well, so I usually buy a bulk pack for about $5 and then defrost some in the fridge when I need to make sushi rolls.I use imitation crab for my sushi rolls, specifically crab-flavoured Alaskan Pollock. I cut my crab-sticks in 1/2 so that there’s more room for other filling within the roll. For my tuna rolls, I use Clover Leaf’s Spicy Thai Chili Tuna, but you can just use plain, flaked tuna and mix it with a bit of mayo and hot sauce.Sushi Rice
    4. Prepare Your Rice
      After the rice has finished cooking, pour it into a mixing bowl and add some rice vinegar (for each cup of rice, I use about 2 tablespoons of vinegar). Mix the rice vinegar with the rice using the rice paddle in careful, chopping motions… being careful not to ‘smoosh’ the rice. Let your rice cool to room temperature (fanning it will help speed up time).
    5. Layout Your “Rolling” Area

      I place a large cutting board on my counter top, place my fillings around it for easy access, then put my rolling mat in the centre. Sometimes people cover their rolling mat with plastic wrap or a large Ziplock bag for easy clean up, especially when making uramaki (inside-out rolls).

    6. Fill That Nori
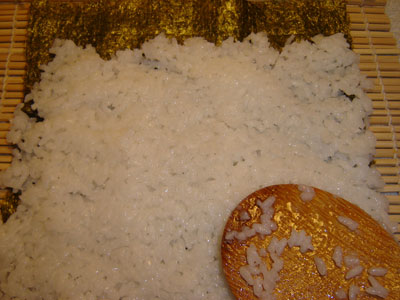
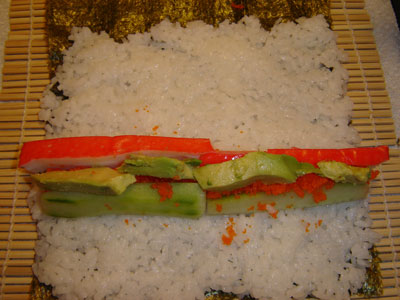
      Place a sheet of nori (rough side up) on the bamboo mat. Depending on weather you like your rolls thick or thin, you can cut the sheet of nori in half lengthwise. I like ’em thick, so I use the whole sheet. Using your paddle, spoon some rice onto the sheet of nori, coating it to the ends. This is where your bowl of water comes in handy. I dip my wooden paddle in the water to moisten it a bit, so that the rice doesn’t stick to it as much and easily comes off onto the nori.Note that if you’re making regular makizushi (nori on the outside), leave about a 1/2 inch of the nori on top uncovered, so that it’s easier to seal. For uramaki (rice on the outside), spread the rice to the ends, putting a thicker layer of rice near the top to make sure none of the nori pokes out after you roll. Place your ingredients about 3/4 of the way down from the end of the nori sheet. If you put it right at the end it will be difficult to roll it up. I usually stack my cucumbers and crab first, then layer the avacado and masago on top. For Uramaki, you’ll have to flip the rice-covered nori over THEN place your ingredients on the nori side of the sheet before you roll (you can sprinkle toasted seseme seeds on the rice before you flip, or wait until after you roll it up).

      Making SushiMaking Sushi

    7. Roll ‘Em, BabyMaking Sushi
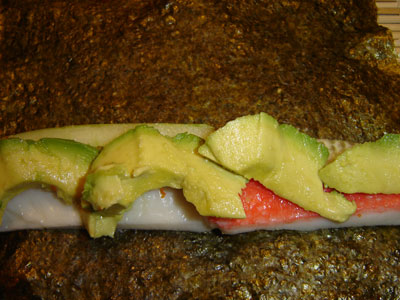
      Very carefully, begin rolling your roll (lol, that sounds funny) from the side closest to your body. Make sure you don’t roll up the plastic wrap or bamboo sheet into the roll you’re making. Basically, you’re going to roll a bit (picking up the bottom of the nori and covering the part of the roll with the filling), and apply some pressure with the bamboo mat to keep things tightly intact. After you roll uramaki, you can roll it on some masago or toasted seseme seeds (so it sticks to the rice) for some extra flavour and presentation. For regular maki, make sure you wet the top edge of the exposed nori a bit, to seal in the edge of the roll.
    8. Cut It
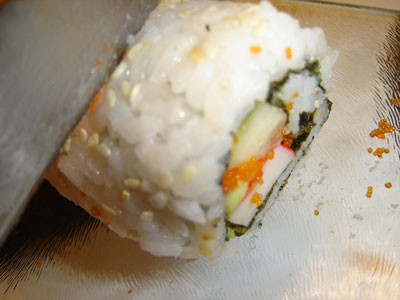
      Using a sharp, wet knife, slice your sushi roll into about 6-8 pieces. I find that using a serrated knife helps with the cutting process (especially the nori), but as long as it’s a good, sharp knife it should cut the maki roll nicely.
    9. Present It

      Sushi’s really all about presentation. I purchased some really nice sushi plates and condimentMaking Sushi bowls from Winners (at a good price). I’m pretty sure you can find them at your local department store or Asian supermarket. Pour some soy sauce into a small bowl and add a bit of wasabi and gari if you like. Don’t forget the chopsticks.

    10. Eat It
      No explanation necessary. Enjoy!

    Don’t worry if your sushi comes doesn’t come out right after the first few tries. It may take some practice to get it right. Try some different variations where fillings are concerned. If you’d like more info on how to make your own sushi, along with some advanced instructions, check out these helpful links:

    makemysushi.com
    imakesushi.com
    sushifaq.com

  • Korean Grill House

    Korean Grill House

    My belly is stuffed. I really need to cut down on the amount of all-you-can-eat restaurants I go to. I just came back from Korean Grill House at Yonge & Bloor (they have three other locations in Toronto: Queen & University, Hwy 7 & Leslie, Midland & Finch, and the new Yonge and Dundas location).

    If you aren’t familiar with the Korean BBQ deal let me fill you in: For as low as $8.99 (lunch & night-owl specials) you can have raw meat served to you and you can cook it yourself on a gas-powered grill that is equipped at each table. Yeah, I know… it doesn’t sound too temping. Why would you have to pay to cook my own food, you ask? It’s all about fun: Laughing at your friends char-broiling their beef to a crisp, or making sure you date doesn’t get food poisoning (okay, you have no one to blame but yourself here… ). All the meat is thinly sliced so that it’ll cook quicker and prevent you from ‘accidently’ poisoning yourself by undercooking.

    The service (at least at the Yonge and Bloor location) is excellent. The staff were very quick to refill our orders of meat and sides, and my water glass was never empty. $8.99 will get you a soup to start, rice and a decent meal of pre-seasoned pork, beef, chicken, squid and fish fillet. I recommend not overcooking the squid and fish, since they may tend to get tough fairly quickly. You also get a nice selection of sides: kimchee, tofu, bean sprouts, spicy bean sprouts, and pickled Radish (my favourite!). If you want a bit more of a selection, you can get ox tongue, ox liver, salmon, and beef ribs along with the above items for $12.99.

    The Meat

    They also have regular dishes to go along with their AYCE menu, such as salads, soups and bibm bahb (check out the selection of cooked cuisine on their à la carte menu on their website). I tried their spring rolls, and they were tasty, but small (about the size of my little finger… and I have long fingers!). I also need to mention their free refill policy on fountain drinks which is great… I’ve never seen free refills on Nestea’s ice tea before!

    Aesthetically speaking: The Yonge and Bloor location has a very modern decor… very spacious and bright. The food will leave you feeling full. So if you carnivores are in the area of a Korean Grill House, and are feeling rather famished and only have $15 to your name, make sure you stop in and play with your food.