Last week I took part in my very first Paint Nite event! You may have seen their discounted voucher offers floating around sites like Groupon. I purchased a couple for myself for the discounted price of $25, which I figured was a great deal considering the regular advertised price is $45 + tax.
What is Paint Nite? Think of it as a big, painting party:
Paint Nite® is a new concept of blending two timeless pastimes, artistic painting and drinking cocktails, as a way to draw patrons into local pubs on a slow night with a unique opportunity to socialize and be creative… [It] is about making art accessible to people who don’t consider themselves artists or creative in any way… about fostering a fun, low stress, non-judgmental environment that inspires everyone to enjoy the process of creating something from nothing.
I was a bit apprehensive about going solo, but was reassured a bit when I read that people attend these events both alone or with friends (there were a few other solo attendees at the event I went to). Paint Nite currently has events in over 50 cities in North America. The Toronto ones seem to be happening on multiple nights each week at an array of different venues, so if you’re interested then you’re bound to find an event that fits your schedule and location.
There’s absolutely no experience required for attending these events (thank goodness). I haven’t really painted before (except for a few short workshops at school), even though I own a wide range of paint supplies (that are about to be dusted off).
You register through the Paint Nite website. Each Paint Nite that’s offered has the name of the artist instructor, a photo of the painting that an artist will walk you through, a difficulty scale, as well as the location of the neighborhood restaurant or lounge in which the event will take place.
The event that I went to, “Safari Sunset”, took place at Allycatz. I found the 6:00 timeslot good for an after-work activity. Allycatz is a good venue to host Paint Nite, as the raised “stage” area was good for the artist to showcase all the steps to the painting. Though, I felt the seats were a little close together (I almost got poked in eye by a paintbrush by one of the people sitting beside me, and a couple wine glasses almost toppled over). Co-Organizer Nathan Schonberger and artist Basil Hendy greeted all of us eager painters as we walked in.
Each of the 32 stations were laid out neatly, complete with a 16″x20″ canvas, a styrofoam plate with 4 basic colours of acrylic paint that were needed to complete the artwork (red, yellow, black and white), an apron, brushes of three different sizes and a cup of water (for cleaning your brushes, not drinking… though I bet someone made that mistake before).
Everyone in attendance though was upbeat. You can sense the excitement as everyone wanted to complete their own masterpieces. The instructions were broken down by well-paced steps that were fairly easy to follow. There were some moments of frustration by a few who couldn’t get the shape of the elephant right (at first mine started to look like one of the walker vehicles from Star Wars), but Basil was extremely helpful and positive in his delivery of the painting instructions.
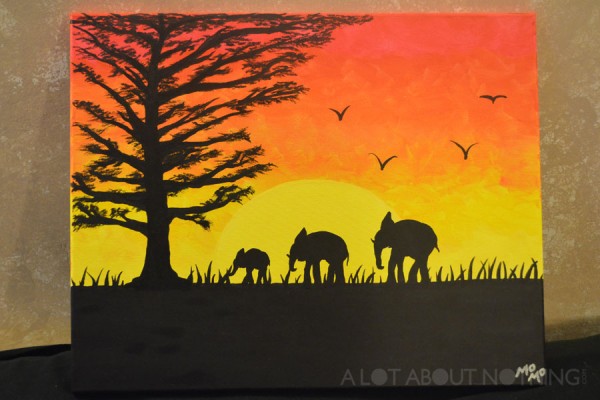
The evening lasted a little over 2 hours. My painting dried fairly quickly so that I could take it home right after the event. I was impressed with my final masterpiece (though I thought the tree came out a little strange so I tried to add to it when I got home… I also realized I initially forgot to add a tail to the baby elephant, so I fixed that as well). Signing my painting was probably the most difficult part (added a little water to the white paint to thin it out so that it was more fluid for my signature), so I ended up just shortening my name!
My first Paint Nite masterpiece, titled “Safari Sunset” (instructor Basil Hendy).
If you ever wanted to try your hand at painting, or just up for a fun, but different, night out with a group of friends, Paint Nite should definitely be an option. Best of all, you’ll leave with a cool painting you can hang in your home (or give to your mother to put on the fridge, like in your childhood days). I’m looking forward to creating my next work of art! Maybe next time I’ll actually buy a drink and see how my canvas turns out.
Halloween 2013 was definitely one of the most entertaining I’ve had.
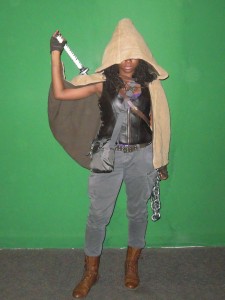
Not only did I make a kick-ass Michonne costume, but I got to show it off at a couple of events on All Hallows Eve.
The whole Michonne getup. I even tried to get a similar grey satchel!
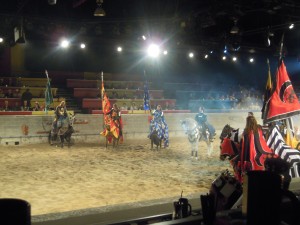
A group of 10 of us purchased discounted tickets to Medieval Times. I’ve never been before, so was keen on checking it out (who’s to turn down a good ol’ joust?). Tickets were only $30, which is a steal compared to their regular price of $63.95.
It was cool seeing the medieval characters act out the storyline throughout the night. We were seated in the black & white section and given our cardboard crowns and flags to cheer for our knight. The “battles” actually held my attention. Sparks were flying as each knight fought their carefully choreographed with their steel blades. Sparks were also flying whenever the Green Knight came into the arena (he was a dead ringer for the handsome actor Chris Hemsworth).  The Green Knight claimed victory at the end of the evening. But I give best fashion sense to our black & white knight who sported a cool moustache (I even caught the carnation he threw into our row!)
This Halloween special event was only $30!
.
Whenever I asked people about the food at Medieval Times, they would say it left something to be desired. I don’t know if they recently changed their recipe, but the food was actually pretty decent (though it could’ve been the fact that my friends and I were really hungry).
On the menu was garlic bread, tomato bisque soup, a tasty half-a-chicken, a single rib, a baked potato and an apple tart for dessert. For the price, I think it was a very good evening.
After Medieval Times (at which a couple of the workers stated they absolutely loved my Michonne costume), we headed to The Church Street Block Party. I’m seriously thinking about making a stop here each Halloween, because the costumes you see at this street event are so creative and well done.
I felt like a celebrity walking down the crowded street in my Michonne costume. Got stopped multiple times to pose for photos with fans from The Walking Dead. One girl actually said seeing me in my costume made her night. Another one shouted “Michonne! Where’s your zombies?” I had to reply (while pointing to my empty chain around my waist) that they ran away.
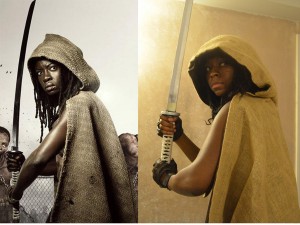
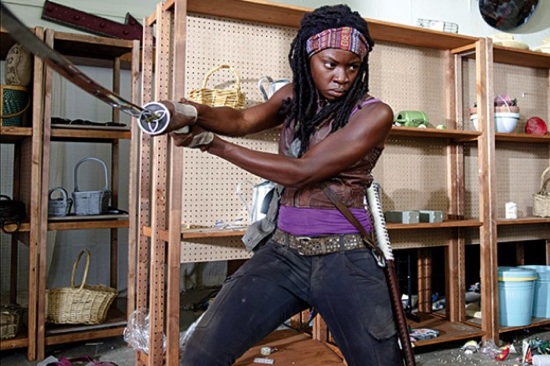
A split screen with actress Danai Gurira who plays Michonne on The Walking Dead.
I think my costume is pretty similar! Though I wish the vest was a lighter shade of brown.
I think I did a pretty good job with the cloak for not using a sewing pattern.
Some of my favourite costumes of the night: Bishop (90s version from X-Men), Thundercat’s Cheetara, and a sea coral (balloons) with a couple Nemos. Can’t wait ’til next year.
My costume is getting a rest until Comic Con in March 2014!
Last summer one of my friends told me, “You remind me of this girl on this show called The Walking Dead”. I was thinking, “Preposterous… There aren’t any fierce, black actresses on TV that could mimic my reserved, often misinterpreted scowling demeanor!”
I was mistaken. A few months later when I finally watched a full episode of The Walking Dead, I thought, “Yup. That’s pretty much me.” (minus the prowess for slicing up zombies with a katana). Such badass of a female character!
After getting caught up this past September on the entire series on AMC via a television marathon, I decided I was going to dress up as Michonne (played by the beautiful Danai Gurira) for Halloween, and most likely recylcle the costume for the upcoming Comic Con and Fan Expo (there’s only so many times I can wear my handmade Star Trek outfit).
Michonne doing what she does best (photo from entertainmentfuse.com)
When I googled the Michonne character online, I realized something: I already own every piece of clothing the character wears (not surprising coming from a self-professed shop-a-holic). From the tight, grey cargo pants (Guess, courtesy of the Bay), to the purple tank top (I knew buying all those tank tops in every single colour when they were on sale for $1 would come in handy), to the boots (Payless, I have big feet), and even the freakin’ headband (matches exactly… I think I picked this up from a black hair store years ago).
The only thing missing was a brown, rivited belt ($3.99 at Value Village), the fingerless gloves ($5 from eBay), and her brown leather vest (this was the only thing I splurged on because it was so hard to find… I don’t even want to mention how much I paid for it. Hopefully, I’ll get invited to some biker parties over the next year).
When it comes to Halloween, I like being as detailed as possible with my costumes. I even purchased “official” iron on patches for my Star Trek and NYPD Police Officer for previous years.
I think I got close enough to match the Michonne character (I got some good responses from a Halloween party I went to last Saturday, and that was before my vest arrived in the mail).
Michonne’s trademark katana sword also took a little work to find. Sure I could of used one of those $10 samauri swords they sold in the Halloween shop, but they’re often really short, and didn’t have the nice detailing that Michonne’s sword has.
Don’t worry, I didn’t shell out $350 for the official Michonne replica katana. That would be overkill (but if anyone wants to buy me that for Christmas this year, it would look lovely mounted on my wall).
Spirit Halloween added some new The Walking Dead merchandise this year. Included was a Michonne wig (complete with headband), and the katana sword ($19.99, but cheaply made, because some of the silver paint at the tip started coming off of the foam… good thing I have a silver sharpie). Luckily I called and had them put it on hold, because it was the last one (and this was weeks ago).
I’ve left my natural hair in my havana twists since last month, because I wanted the “dreadlocks” look. So no need for the wig (which doesn’t look too realistic anyways).
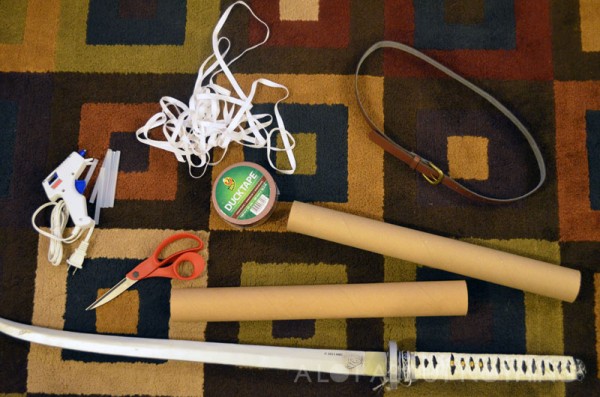
Unfortunately the katana didn’t come with a sheath/saya. So I made my own! This was actually a fun DIY project. The final results were pretty good.
All the materials I used to recreate Michonne’s katana: poster tubing, white trimming, brown belt, brown duct tape, glue gun and scissors. I also used an old lanyard ring and a bent paper clip for the fasteners, as well as some yarn to recreate the detail on the saya.
I used two poster mailer tubes (paper towel roles would have been a second option, but a little too light), brown duct tape (to mimic the leather), 4 metres of white trimming ($2.50 from Fabricland), and a brown, leather belt ($1.99 from Value Village). A pair of scissors and my trusty glue gun sealed the project.
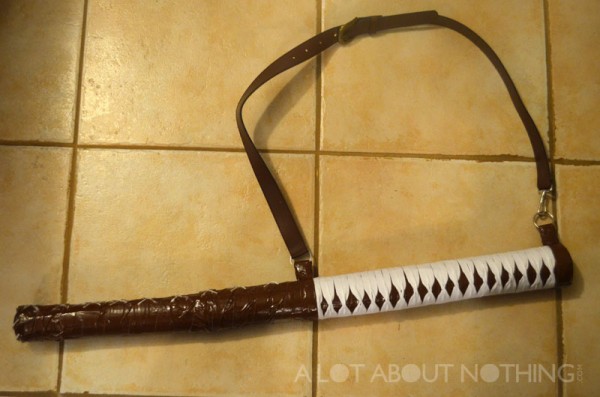
The finished product!
But wait… There’s more!
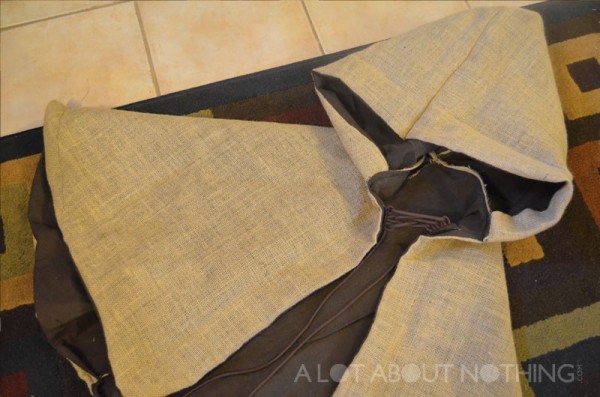
Best character entrance in a season finale? A hooded Michonne walking in and saving Andrea with her two zombie pets in tow! Now I couldn’t track down two guy friends who would be shackled to me on Halloween, so sewing the hooded cloak would have to be the finishing touch for my costume.
I bought some brown fabric from Value Village for $5.99 (it was actually an old curtain), got some burlap from Michael’s (1.8 metres for $6.00). I’m not an expert sewer, but I did my best. I didn’t use a pattern, because I procrastinated enough and sewed it the day before the Halloween party. But sectioning it into 4 parts, lining the burlap, and then sewing it all together, it fit pretty well. I even made a makeshift fastener for the neck with shoelace!
My homemade hooded cloak inspired by The Walking Dead character, Michonne.
I’ll try to post how-to articles later on next month for both the saya and the hooded cloak.
In part two of this post, I’ll be posting a photo of my full costume and let you know of the reaction I got from the public.
This year, the responsibility of hosting the annual family Thanksgiving dinner landed on my shoulders… two days before the big day (don’t you just love family?). I picked up a frozen Butterball turkey on the Saturday, and crossed my fingers that it would thaw out within the next 36 hours so that I would have time to prep it before putting it in the oven.
Despite my love of cooking, this marked the very first time that I prepared a turkey from start to finish on my own. I had to defrost it as quickly as possible. Ideally I would’ve left it in the fridge for a couple of days, but with dinner a little more than a day away I needed it to thaw out fast.
I didn’t want any chance of bacteria growing, thus giving my family food poisoning, so I knew I had to thaw it correctly. So I opted to put the big guy in a large pot of cold water, making sure that I replaced the cold water every couple of hours. Because this sucker was so big, I had to keep on rotating it in the wok I was using to thaw it out, but it worked: it was thawed out completely within 6 hours.
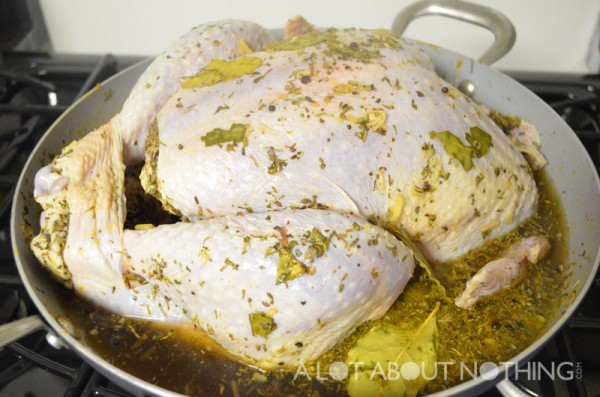
After removing the giblets and neck, I rinsed the turkey under cold water. Then it was on to the first flavouring step: a brine.
Turkey Brine Recipe
1 cup kosher salt
1 cup brown sugar
3 tbsp of whole black peppercorns
6 bay leaves
1 tbsp dried sage
1 tbsp dried thyme
1 tbsp dried onion flakes
2 tsp chopped garlic
3 cups water
I boiled all the ingredients together for a few minutes of minutes (until the salt and sugar dissolved), then took it off the heat to cool down. Once completely cool, I added the brine to about 4 litres of cold water. This was the “turkey bath”. I left the turkey to brine in the refrigerator overnight.
After I took the turkey out of the brine, I patted it dry. Â I purchased a turkey baster that came with a flavour injector needle at the last Kitchen Stuff Plus warehouse sale. So I mixed together the following ingredients and injected it all over my turkey (concentrating on the “meaty” areas” then let it sit for an hour in the fridge:
Turkey Injection Marinade
1/4 Â cup chicken broth
1/4 cup olive oil
2 tbsp Worcestershire sauce
1 tsp each of paprika, oregano, onion powder, garlic powder, salt and pepper
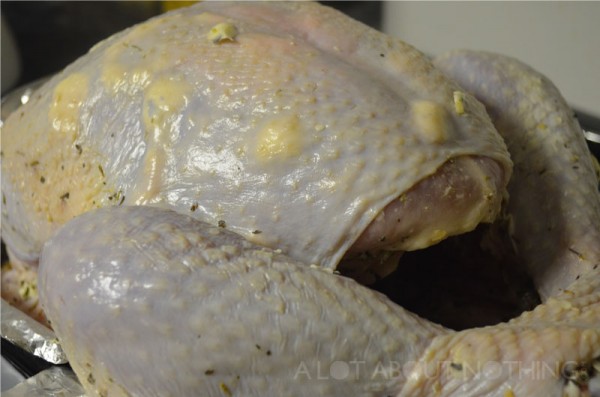
The final step for my flavourful turkey project was the rub. I used a spatula to slide inbetween the skin and the meat of the turkey, so that I could make some room to add pads of unsalted butter. I also used some melted butter, along with some olive oil, to rub on the outside skin of the turkey (so that the rub had something to adhere to).
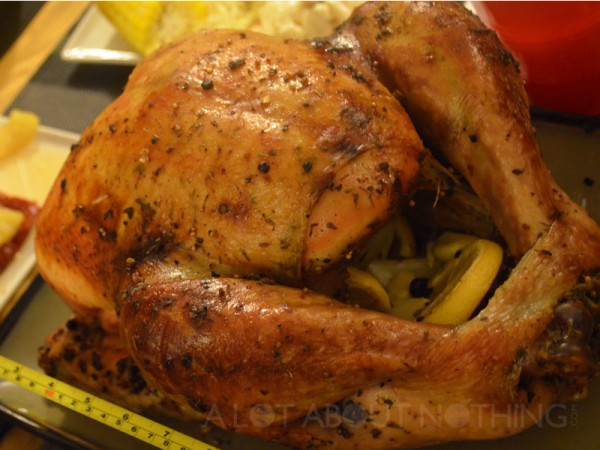
Note: I decided not to stuff my turkey, but make the stuffing separate. It helps speed up the cooking time. I just stuffed the cavity with a couple of halved onions, a few garlic cloves, and some slices of lemon.
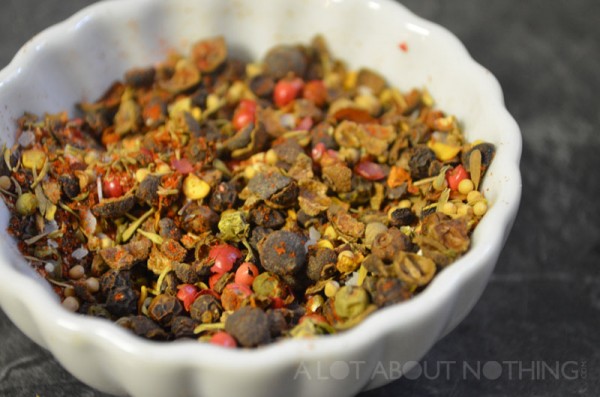
Turkey Rub Recipe
1 tbsp paprika
1 tbsp onion powder
2 tsp garlic powder
2 tbsp of 5 peppercorn blend (green, pink, white and black peppercorns, and Jamaican allspice), crushed
2 tsp mustard seeds, crushed
1 tsp red pepper flakes
1 tsp kosher salt
1 tsp ground ginger
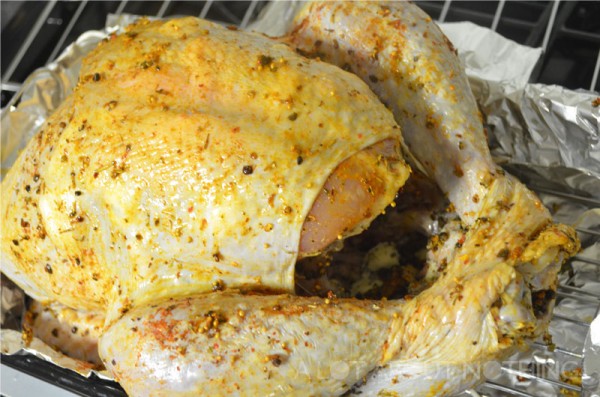
Once the turkey was basted with the rub, I rested on a rack in the roasting pan, added some chicken broth to the bottom of the pan, and popped it in the oven, loosely covered with foil.
I had preheated my oven to 425F degrees. Then after cooking the turkey for 30 minutes, I lowered the heat to 350F. I basted every hour, taking the foil off during the last hour of cooking, and raising back up the heat to 425F, so that it can create a nice crust. 4.5 hours total baking time for this 12lb turkey.
It came out so flavourful, moist and delicious. If you’re trying to make a turkey (or whole chicken) and want to make sure that it doesn’t come out dry and tasteless, try using the previous three steps in order to roast a great turkey.
I’ve been there a few weeks ago and I’m from The Netherlands so i should know how it would taste and I got a apple crumble pie and it was the best I’ve ever had little expesive but okay it was delicious!


on August 11, 2016