I had a huge 80s-themed birthday last month (stay tuned for the updated post), and went to town on all the treats and decorations. One of them was Pac-Man cookies. Super simple to make, and they were a hit.
Yield: About 60 cookies
Ingredients:
2 packages of Oreo cookies (or any dark-coloured cookie)
10g black or chocolate-flavoured candy melts or moulding wafers (for the eyes — optional)
Coconut Oil
Method:
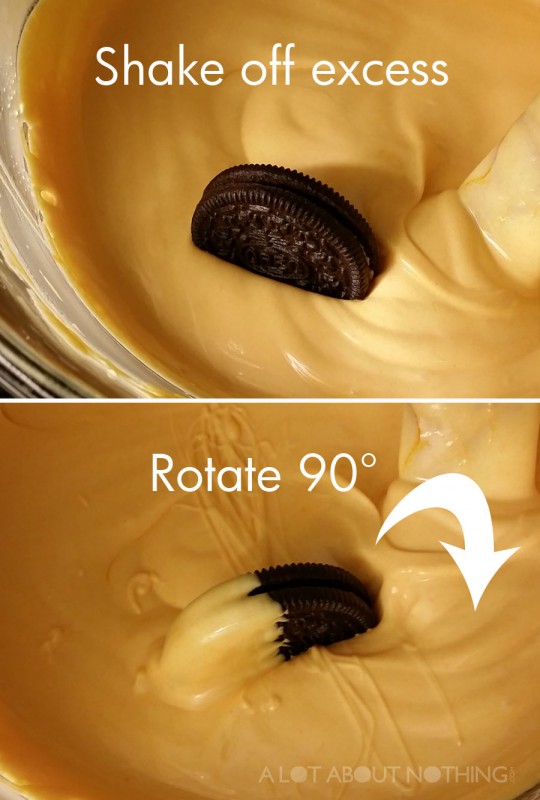
Using a double boiler (I used a glass bowl over a saucepan filled with some water), melt the wafers over simmering heat, stirring constantly until they have melted. Remove from heat.
Take an Oreo cookie and dip it halfway into the mixture, letting the excess drip off carefully back into the bowl. Rotate the cookie 90° and dip it into the mixture again. This should create the “open mouth” Pac-Man shape.
Place cookie on a lined baking sheet covered with parchment paper.
Repeat with remaining cookies until all are dipped. Water should not come in contact with the wafers, as it will ruin the smooth consistency. If the mixture is too thick you can add a bit of melted coconut oil to thin it out.Â
For the eyes, melt the chocolate-flavoured wafers in a small bowl in the microwave for 1 minute on low power (or until melted). Fill a sandwich bag with the mixture, cut a small piece off the corner to form a piping bag. Gently squeeze a bit of the dark mixture to dot eyes for the Pac-Man cookies.
Cookies harden fairly quickly. After 20-minutes or so they can be stacked in a reusable container, ready to be eaten!
This year, the responsibility of hosting the annual family Thanksgiving dinner landed on my shoulders… two days before the big day (don’t you just love family?). I picked up a frozen Butterball turkey on the Saturday, and crossed my fingers that it would thaw out within the next 36 hours so that I would have time to prep it before putting it in the oven.
Despite my love of cooking, this marked the very first time that I prepared a turkey from start to finish on my own. I had to defrost it as quickly as possible. Ideally I would’ve left it in the fridge for a couple of days, but with dinner a little more than a day away I needed it to thaw out fast.
I didn’t want any chance of bacteria growing, thus giving my family food poisoning, so I knew I had to thaw it correctly. So I opted to put the big guy in a large pot of cold water, making sure that I replaced the cold water every couple of hours. Because this sucker was so big, I had to keep on rotating it in the wok I was using to thaw it out, but it worked: it was thawed out completely within 6 hours.
After removing the giblets and neck, I rinsed the turkey under cold water. Then it was on to the first flavouring step: a brine.
Turkey Brine Recipe
1 cup kosher salt
1 cup brown sugar
3 tbsp of whole black peppercorns
6 bay leaves
1 tbsp dried sage
1 tbsp dried thyme
1 tbsp dried onion flakes
2 tsp chopped garlic
3 cups water
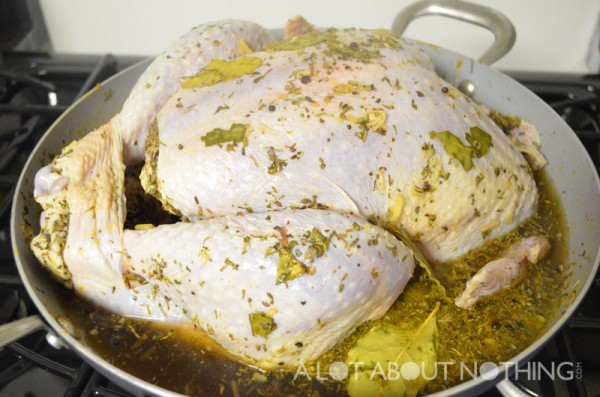
I boiled all the ingredients together for a few minutes of minutes (until the salt and sugar dissolved), then took it off the heat to cool down. Once completely cool, I added the brine to about 4 litres of cold water. This was the “turkey bath”. I left the turkey to brine in the refrigerator overnight.
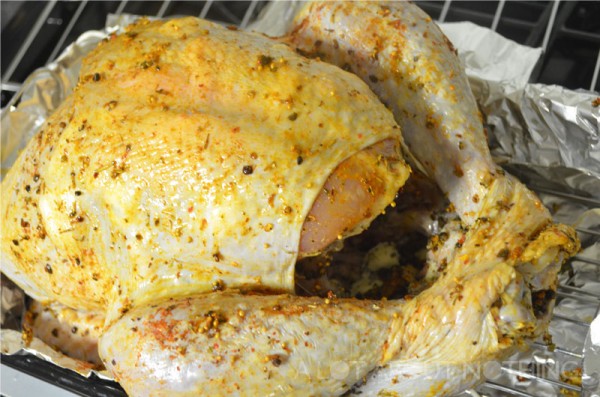
After I took the turkey out of the brine, I patted it dry. Â I purchased a turkey baster that came with a flavour injector needle at the last Kitchen Stuff Plus warehouse sale. So I mixed together the following ingredients and injected it all over my turkey (concentrating on the “meaty” areas” then let it sit for an hour in the fridge:
Turkey Injection Marinade
1/4 Â cup chicken broth
1/4 cup olive oil
2 tbsp Worcestershire sauce
1 tsp each of paprika, oregano, onion powder, garlic powder, salt and pepper
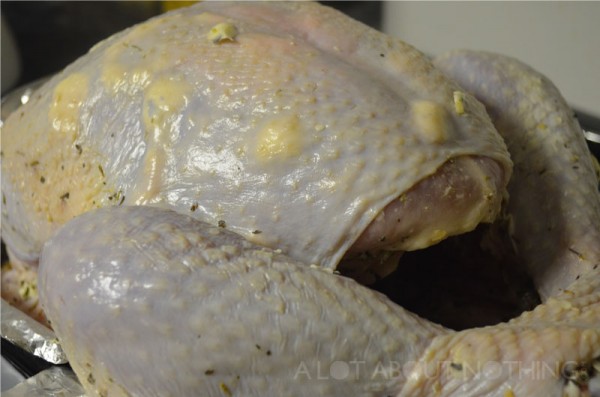
The final step for my flavourful turkey project was the rub. I used a spatula to slide inbetween the skin and the meat of the turkey, so that I could make some room to add pads of unsalted butter. I also used some melted butter, along with some olive oil, to rub on the outside skin of the turkey (so that the rub had something to adhere to).
Note: I decided not to stuff my turkey, but make the stuffing separate. It helps speed up the cooking time. I just stuffed the cavity with a couple of halved onions, a few garlic cloves, and some slices of lemon.
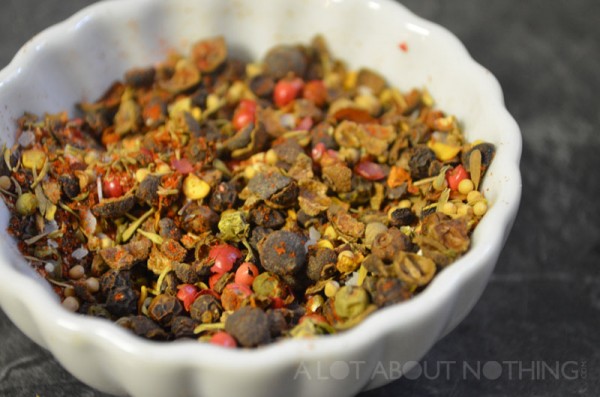
Turkey Rub Recipe
1 tbsp paprika
1 tbsp onion powder
2 tsp garlic powder
2 tbsp of 5 peppercorn blend (green, pink, white and black peppercorns, and Jamaican allspice), crushed
2 tsp mustard seeds, crushed
1 tsp red pepper flakes
1 tsp kosher salt
1 tsp ground ginger
Once the turkey was basted with the rub, I rested on a rack in the roasting pan, added some chicken broth to the bottom of the pan, and popped it in the oven, loosely covered with foil.
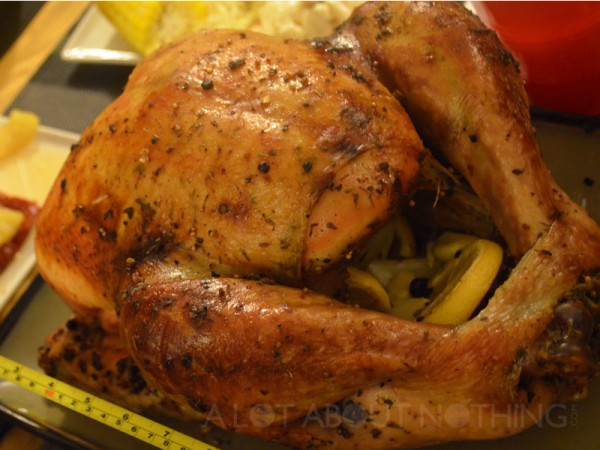
I had preheated my oven to 425F degrees. Then after cooking the turkey for 30 minutes, I lowered the heat to 350F. I basted every hour, taking the foil off during the last hour of cooking, and raising back up the heat to 425F, so that it can create a nice crust. 4.5 hours total baking time for this 12lb turkey.
It came out so flavourful, moist and delicious. If you’re trying to make a turkey (or whole chicken) and want to make sure that it doesn’t come out dry and tasteless, try using the previous three steps in order to roast a great turkey.
Okay, okay… so the title of this recipe may not sound too appetizing, but I assure you that this is a quick, tasty and affordable meal. My mom used to cook this for my siblings and I every once in a while and I just loved how the simple flavours worked together and satisfied my appetite!
Ingredients:
1 small head of cabbage (shredded or thinly sliced)
1 red onion (thinly sliced)
4 beef/chicken/veggie weiners (sliced)
4 strips of bacon (sliced into small strips)
2 cloves of garlic (minced)
1 cup vegetable stock or water
1/2 tsp red pepper flakes
1 tsp caraway seeds
1 tsp of pepper
1/2 tsp salt (optional)
Directions:
Heat a wok or large frying pan on medium-low heat. Add sliced bacon and fry for 2 minutes until lightly browned.
Add onion and continue to cook until onions soften (about 4-5 minutes).
Stir in garlic, red pepper flakes, pepper and caraway seeds and cook for an additional 2 minutes.
Add in cabbage and sliced wieners, then slowly pour in vegetable stock.
Cover and simmer on low heat for about 15-20 minutes (or until cabbage is wilted and no longer crunchy), stirring occasionally.
This is a recipe that I submitted to Pillsbury’s Baking Challenge. I heard about the contest one night, and realizing that I only had a couple of days to create a recipe, I found a tube of Pillsbury Crescents in my fridge and started brainstorming. Apple-Cheese Struesel Squares (or rectangles, depending on how you cut ’em), is what came out of it all. After serving the delicious dessert to several friends of mine (and of course, trying it myself), I knew I had a winner in my books. Moist and flaky Pillsbury Crescent base for this quick and easy dessert, along with the blend of tender apples, cream cheese and streusel topping. If you enjoy the recipe, remember to head over to the Pillsbury Baking Challenge website and vote for my dessert (you can vote once a day)!
For apple filling:
2 cooking apples, peeled and sliced (e.g. golden delicious)
3 tbsp unsalted butter (45 mL)
2 tbsp brown sugar (30 mL)
1 tsp ground cinnamon (5 mL)
1/2 tsp ground nutmeg (2.5 mL)
For Streusel Topping:
1/3 cup flour (75 mL)
1/4 cup brown sugar (50 mL)
1/4 cup unsalted butter (50 mL)
1 tsp ground cinnamon (5 mL)
Directions:
Grease an 8-inch casserole dish and preheat the oven to 350 degrees F (175 degrees C).
In a saucepan over medium heat, melt the 3 tbsp of unsalted butter for the apple filling. Add in the 2 tbsp of brown sugar and cinnamon and stir until dissolved. Gradually add in the sliced apples and cook for about 5 minutes, stirring occasionally. Remove from heat.
In a medium bowl, using a spatula mix together the ingredients for the cream cheese filling: cream cheese and granulated sugar until blended, then add in the egg and vanilla extract. Set aside.
For the streusel topping, mix together the flour, sugar and cinnamon. Using a pastry blender or a fork, cut in the butter and combine until the mixture resembles coarse crumbs.
Open the can of Pillsbury* Crescent Rolls and arrange four sections in the bottom of the casserole dish to cover the bottom of it (use your fingers to stretch the dough slightly if necessary). Slowly pour the cream cheese mixture over the bottom layer of the Crescent dough. Top the cream cheese mixture evenly with the semi-cooked apple. Add the remaining four pieces of Crescent dough on top of the layers to seal.
Top the layers evenly with the streusel topping and bake in the pre-heated oven for 25-30 minutes, or until the top is golden-brown. Cool for 5 minutes before cutting into squares.
Tips and suggestions: Top with chopped walnuts prior to cooking and serve with vanilla ice cream.
This recipe makes a great appetizer, or all around savoury snack if you’re a fan of fish and potatoes. You can experiment with any type of fish you’d like (or even mix them like I did), but I think cod, salmon or sole work really well. A helpful hint: if you want to reduce the cooking time, cut your potatoes into chunks (instead of boiling them whole), so that they cook quicker.
Yield: 12-14 fish cakes
Ingredients:
4 small white potatoes or 2 large russett potatoes (cut into large chunks)
2 salmon, cod or sole fillets (about 250-300g total)
1 egg (lightly beaten)
1 tbsp milk
1/2 cup plain breadcrumbs
1/4 cup fresh dill (chopped)
3 green onions (finely chopped)
1/4 tsp garlic powder
1 tsp lemon juice
1/2 tsp pepper
1 tsp salt, or to taste
3 tbsp canola oil (for frying)
Directions:
Boil potatoes for about 15 minutes, or until tender.
While the potatoes are boiling, sear the fish fillets in a frying pan with a bit of oil for 5-10 minutes over medium heat. When they are almost fully cooked, remove from heat and flake into bits with a fork.
Drain potatoes and place into a large bowl. Quickly mash with a potato masher, adding milk and egg to themixture.
Mix the flaked fish into the mashed potatoes. Add in the breadcrumbs, green onions, dill, garlic powder, salt and pepper until well combined.
Using your hands, roll a portion of the mixture into a ball and form small patties (a little bigger than a squash ball, or larger if you like). Place fish cakes in a frying pan with oil over medium heat.
Fry each potato fish cake for about 5 minutes on each side until golden brown. Drain on a paper towel-lined tray or plate. Serve with your favourite seafood dipping sauce, ketchup or enjoy as is.
I’ve been there a few weeks ago and I’m from The Netherlands so i should know how it would taste and I got a apple crumble pie and it was the best I’ve ever had little expesive but okay it was delicious!


on August 11, 2016