Last summer one of my friends told me, “You remind me of this girl on this show called The Walking Dead”. I was thinking, “Preposterous… There aren’t any fierce, black actresses on TV that could mimic my reserved, often misinterpreted scowling demeanor!”
I was mistaken. A few months later when I finally watched a full episode of The Walking Dead, I thought, “Yup. That’s pretty much me.” (minus the prowess for slicing up zombies with a katana). Such badass of a female character!
After getting caught up this past September on the entire series on AMC via a television marathon, I decided I was going to dress up as Michonne (played by the beautiful Danai Gurira) for Halloween, and most likely recylcle the costume for the upcoming Comic Con and Fan Expo (there’s only so many times I can wear my handmade Star Trek outfit).
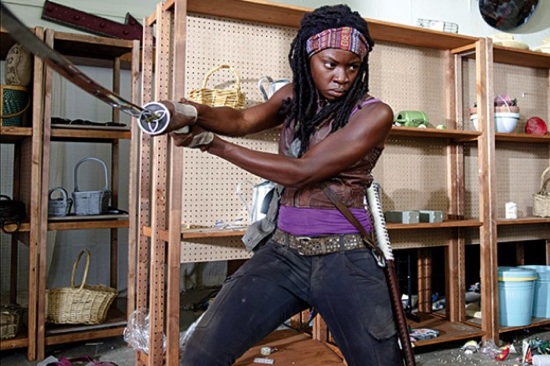
Michonne doing what she does best (photo from entertainmentfuse.com)
When I googled the Michonne character online, I realized something: I already own every piece of clothing the character wears (not surprising coming from a self-professed shop-a-holic). From the tight, grey cargo pants (Guess, courtesy of the Bay), to the purple tank top (I knew buying all those tank tops in every single colour when they were on sale for $1 would come in handy), to the boots (Payless, I have big feet), and even the freakin’ headband (matches exactly… I think I picked this up from a black hair store years ago).
The only thing missing was a brown, rivited belt ($3.99 at Value Village), the fingerless gloves ($5 from eBay), and her brown leather vest (this was the only thing I splurged on because it was so hard to find… I don’t even want to mention how much I paid for it. Hopefully, I’ll get invited to some biker parties over the next year).
When it comes to Halloween, I like being as detailed as possible with my costumes. I even purchased “official” iron on patches for my Star Trek and NYPD Police Officer for previous years.

I think I got close enough to match the Michonne character (I got some good responses from a Halloween party I went to last Saturday, and that was before my vest arrived in the mail).
Michonne’s trademark katana sword also took a little work to find. Sure I could of used one of those $10 samauri swords they sold in the Halloween shop, but they’re often really short, and didn’t have the nice detailing that Michonne’s sword has.
Don’t worry, I didn’t shell out $350 for the official Michonne replica katana. That would be overkill (but if anyone wants to buy me that for Christmas this year, it would look lovely mounted on my wall).
Spirit Halloween added some new The Walking Dead merchandise this year. Included was a Michonne wig (complete with headband), and the katana sword ($19.99, but cheaply made, because some of the silver paint at the tip started coming off of the foam… good thing I have a silver sharpie). Luckily I called and had them put it on hold, because it was the last one (and this was weeks ago).
I’ve left my natural hair in my havana twists since last month, because I wanted the “dreadlocks” look. So no need for the wig (which doesn’t look too realistic anyways).
Unfortunately the katana didn’t come with a sheath/saya. So I made my own! This was actually a fun DIY project. The final results were pretty good.
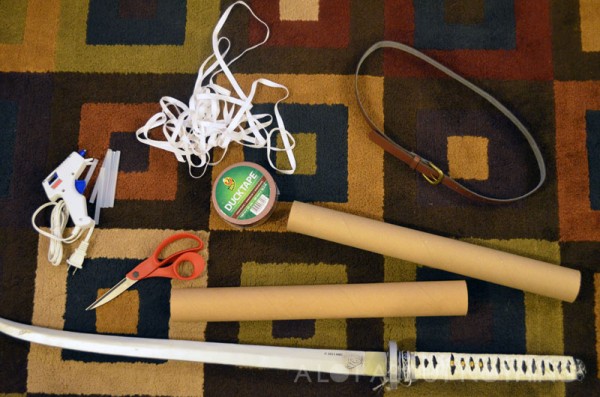
All the materials I used to recreate Michonne’s katana: poster tubing, white trimming, brown belt, brown duct tape, glue gun and scissors. I also used an old lanyard ring and a bent paper clip for the fasteners, as well as some yarn to recreate the detail on the saya.
I used two poster mailer tubes (paper towel roles would have been a second option, but a little too light), brown duct tape (to mimic the leather), 4 metres of white trimming ($2.50 from Fabricland), and a brown, leather belt ($1.99 from Value Village). A pair of scissors and my trusty glue gun sealed the project.
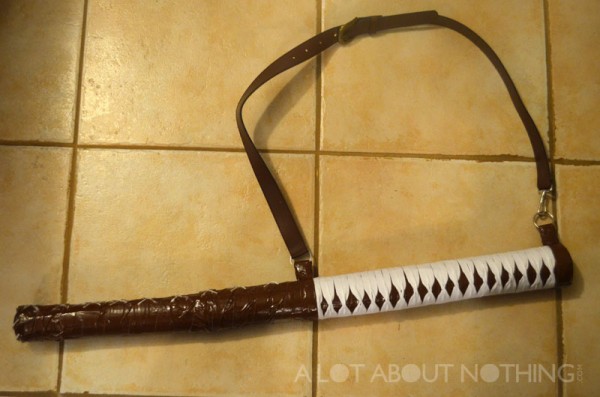
The finished product!
But wait… There’s more!
Best character entrance in a season finale? A hooded Michonne walking in and saving Andrea with her two zombie pets in tow! Now I couldn’t track down two guy friends who would be shackled to me on Halloween, so sewing the hooded cloak would have to be the finishing touch for my costume.
I bought some brown fabric from Value Village for $5.99 (it was actually an old curtain), got some burlap from Michael’s (1.8 metres for $6.00). I’m not an expert sewer, but I did my best. I didn’t use a pattern, because I procrastinated enough and sewed it the day before the Halloween party. But sectioning it into 4 parts, lining the burlap, and then sewing it all together, it fit pretty well. I even made a makeshift fastener for the neck with shoelace!
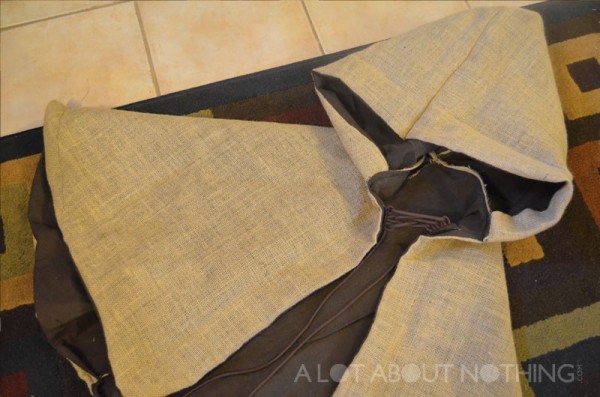
My homemade hooded cloak inspired by The Walking Dead character, Michonne.
I’ll try to post how-to articles later on next month for both the saya and the hooded cloak.
In part two of this post, I’ll be posting a photo of my full costume and let you know of the reaction I got from the public.
Happy Halloween!
Read Part 2 of my Michonne cosplay.

on August 11, 2016