One of my former tech-savvy co-workers dropped by the office today, and what did he have with him? An iPhone! Okay, so I only handled it for a couple of minutes, but it swayed me to seriously think purchasing one when they finally come to Canada… especially for business needs. It’s a little heavier than I thought it would be, but the interface is breathtaking (I just love that slide lock function!).
Perhaps I’ll wait a few months after the mob calms down when it’s released north of the border, though.
I’m a self-proclaimed shop-a-holic. In that admission I’d like to introduce the first of a series of posts that highlight some of my purchases. Not just any purchases, but things that I buy that I don’t ‘necessarily’ need. It’s a habit: when I see something on sale, clearance-priced, and looks like I’d (eventually) use it one day, I’ll probably buy it. I’m a fiend for gadgets and gizmos, so here’s one from today:
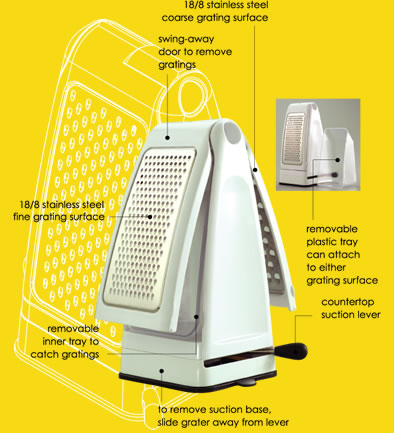
Stixx Suctionwareâ„¢ by DFL, Design for Living.â„¢ A revolutionary line of kitchen products with a unique suction base that stixxâ„¢ to countertops for no slipping, sliding or tipping.
The grater has a suction cup with a lever at the bottom to keep it steady on your kitchen surfaces while grating (it had a pretty strong grip when I used it on my wooden kitchen cart). It has a two-sided grating surface (fine and coarse). Each side has a swing-away door and it comes with a removable inner tray to catch gratings.
Why I don’t need it: I have a Magic Bullet (which I’m in love with)
Why I think I need it: The Magic Bullet doesn’t “shred” cheese, it chops it up into little bits. I sometimes prefer shredded cheese for aesthetic reasons. :) Plus, I think I’ll have fun gripping it to the counter and swinging open the grating doors!
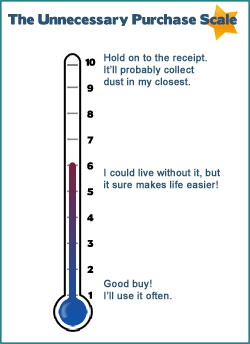
Unnecessary scale: 6/10
I’ll probably use it every now and then… esp. since my magic bullet tends to grate cheese too fine. Plus, I’ll need it to grate veggies like carrots, zucchini and potatoes for some yummy recipes. It only cost me $13, and for a pretty heavy duty grater, that’s a good deal off the original retail price of about $25CAN. It sucks that I have a really small kitchen with minimal counter-space though… :P
I should’ve gotten a PlayStation and Dance Dance Revolution SuperNOVA instead of Hip Hop Abs. Man, this game is a workout! Just got back home from my sister’s BBQ, and my brother had this game on his PlayStation. I’ve always wanted to try that cabinet arcade version, but I think it slipped my mind that they have an ‘at home’ one (I really need to get back into the gaming scene…)
The low level is pretty easy… but I fathom to think how much game practice a person has to do to get a good score at the advance level (damn those speedy arrows!). The game needs better songs though… (although Fall Out Boy’s “Dance Dance” is one of my favs ;) ) I think I lost all the calories I gained eating all that BBQ! I didn’t even know that the home version has a workout mode to estimate calories burned!
So last night (or rather, this morning at 3am), I did something I swore I wouldn’t do until I got my budget in order: I ordered something online. I know, I know… I need to have self-control when it comes to shopping, but this will be worth it in the long run!
My purchase of Hip Hop Abs was sparked by the fact that I realized I had gained another five pounds, contrary to the fact that I’ve been avidly looking at the labels of all the food products I buy to make sure that the calorie factor is low. I realized that this is not enough, and that I have to stop eating those big, super-late dinners and stop skipping breakfast. Six small meals a day, an active workout, and proper diet will need to be my new plan if I want to tone up and slim down.
I’ve used Turbo Jam actively before. I was religiously following a set regimen for about 3-4 weeks and I noticed that I did lose 5-8lbs. But, alas I abruptly stopped b/c I found I was too tired to work out after I got home from a long day at work. Also adding to the fact that I stopped was that I was noticing my clothes fitting a bit better, and people close to me actually noticed that I looked thinner. In reality the numbers on the scale were going up.
Where is all this weight going?!?! I remember when I was at the doctor’s office earlier this year for my annual physical, the nurse weighed me. Prior to setting foot on the scale I informed her of my timidness b/c the last time I checked I was 180lbs. She’s like, “Nooo! That can’t be right, you don’t look more than 140”. Needless to say, she was shocked when she had to keep tipping the weight on the scale to the right to balance it out. LOL… even my doctor didn’t believe me when I told him how much I weighed (the last time he weighed me, I was around 155). Bah… I guess it could be all muscle. (wishful thinking :D)
Back to my Hip Hop Abs impulse buy: It cost me three easy payments of $19.99 (thank goodness, because I don’t think I would want my credit card to go over the limit again this month :D ) I even got 10% for using an online coupon. It comes with 4 routines, an extra DVD bonus and a bunch of little extras (nutrition guides and such). I cracked and got the advance DVD’s as well, because I didn’t want to pay shipping again, and they were offering them at 50% off. Yeah, I know that I probably could’ve saved my money and got a bootleg version, but I’m not the pirating type… ;) The infomercial seems kinda typical, but if the routines are followed closely it actually shows results. Just take a look at Rob’s results from doing Turbo Jam. If you’re in the Toronto-area, take some of his Turbo Jam classes… they’re so much fun, and a great workout! I really need to start going to them again.
I’ll keep my eye on the mailbox for my Hip Hop Abs DVDs. I can’t wait to try out the routines! I had some success with Chalene’s Turbo Jam, so with Shaun T’s DVDs, hopefully I can get great results, especially since it’s done to “Hip Hop”. My dancing days may not be over yet! :D
I love East Asian food. I love it so much that it’s possible that was probably Asian in a past life. I made some sushi the other night, and let me tell you that for a Black girl I make it pretty damn well. ;) A hit at all my dinner parties that I throw at home, it’s a shame that it took me so long to realize that sushi (at least the basic type) can be super-easy to make myself. If you’re craving some Japanese cuisine, there’s no reason to go out to the semi-expensive sushi bar, because you can create your own filling rolls right in the comfort of your own home–for a fraction of the price. Sure it may be a bit tricky at first, but once you get the hang of it, you’ll be tempted to start your own all-you-can-eat sushi restaurant (okay, perhaps that’s a little far fetched, but you get the point).
Now there’s a myriad of types of sushi, but this is a recipe for basic, cheap & simple Monique-Rolls ;) aka California rolls and Tuna rolls. For a short course on some of the terms and a background on Japanese sushi visit the Wikipedia article on sushi.
Here’s a list of things that you’ll need before you begin:
A Bamboo Rolling Mat
Also known as a makisu. Can be found at virtually all Asian grocery stores and at some regular grocery chains
A Rice Paddle
Also known as a shamoji. I purchased a bamboo one at an Asian grocery store for about $1.30… you can try your local dollar store
A Large Bowl
Preferably glass or heavy plastic… stay away from metal
A Cutting Board
Ingredients:
(all the prices posted are based on my purchases from the local Asian grocery supermarket)
Nori
This is the seaweed wrappers used in maki. I usually use Marufuji Yaki-Sushi Nori because of it’s high quality. Just make sure the nori sheets you buy is thick, smooth, and doesn’t have any holes. (approx $2.50 for a pack of 10 sheets)
Sushi Rice or Calrose Rice
The key part of any sushi meal. To make 4 sushi rolls (which could then be cut into about 30 individual pieces), I use 2 cups of rice. When cooking, a 1:1 ratio should be used in order for your medium-grain rice to come out well.
(about $3 for a 2kg package)
Imitation Crab or Canned Tuna
Fresh Vegetables (cucumber, carrots, avacado)
Fish Roe
There are several types of fish roe you can use for maki filling/coating, such as masago, ikura, kazunoko and tobiko. I use masago. ($3 for a small container)
Rice Vinegar
Very important when making sushi. I always purchase Marukan’s Seasoned Rice Vinegar. They also sell the unseasoned kind (which you’d have to add a bit of salt and sugar to for sushi). Seasoned rice vinegar can also be used as a marinade for meat, fish and veggies. I use about a couple tablespoons for each cup of rice. ($3)
Soy Sauce
There are several types available. I’m quite fond of Kikkoman’s Sushi & Shashimi Soy Sauce because it’s a bit sweeter and milder than the original. ($2-3)
Wasabi (optional)
A piquant paste made from the grated root of the wasabi plant. According to Wikipedia, it has anti-microbial properties and may reduce the risk of food poisoning. I mix a bit of S&B’s brand of wasabi in with my soy sauce for dipping. ($2.50/tube)
Gari (optional)
Sweet, picked ginger eaten to cleanse the palate and help with digestion. (I never purchased this before, but the bottle is about $4-5)
Instructions:
Wash The Rice
This is very important. Make sure you wash it several times until the water runs fairly clear after while you drain it.
Cook The Rice
I use a rice cooker, because it does the job so well. But if you don’t have one, a decent pot with a lid will do. Cook the rice for about 15-20 minutes on low heat with the lid covered.
Prepare Your Fillings
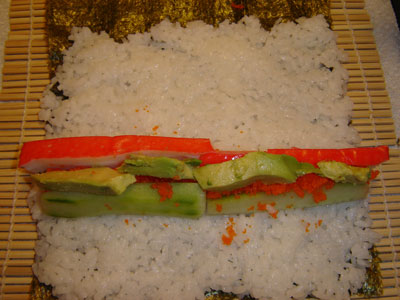
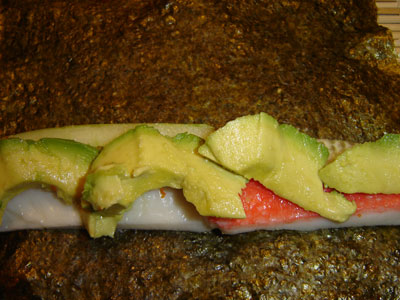
Now that you have some free time, you can prepare your fillings for your maki rolls. Cut an English cucumber in half lengthwise, then down the middle again so that you get the strips small enough to fit within the maki rolls. Sometimes it can be chopped finer. If you want to add some carrots to your California Rolls, go right ahead. In the past I’ve used baby carrots because they’re easier to slice finely. To prevent your avocado from turning brown (due to oxidation), after peeling and slicing wrap them tightly in plastic wrap. You can also spritz some lemon juice on them to keep them fresh. Peeling and cutting an avacado can be tricky… the avocado peeler is your friend. Masago freezes well, so I usually buy a bulk pack for about $5 and then defrost some in the fridge when I need to make sushi rolls.I use imitation crab for my sushi rolls, specifically crab-flavoured Alaskan Pollock. I cut my crab-sticks in 1/2 so that there’s more room for other filling within the roll. For my tuna rolls, I use Clover Leaf’s Spicy Thai Chili Tuna, but you can just use plain, flaked tuna and mix it with a bit of mayo and hot sauce.
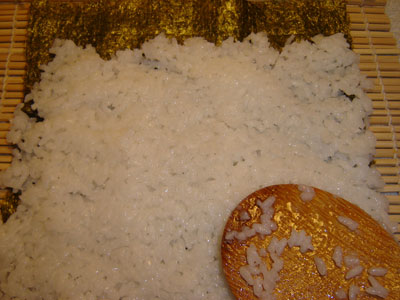
Prepare Your Rice
After the rice has finished cooking, pour it into a mixing bowl and add some rice vinegar (for each cup of rice, I use about 2 tablespoons of vinegar). Mix the rice vinegar with the rice using the rice paddle in careful, chopping motions… being careful not to ‘smoosh’ the rice. Let your rice cool to room temperature (fanning it will help speed up time).
Layout Your “Rolling” Area
I place a large cutting board on my counter top, place my fillings around it for easy access, then put my rolling mat in the centre. Sometimes people cover their rolling mat with plastic wrap or a large Ziplock bag for easy clean up, especially when making uramaki (inside-out rolls).
Fill That Nori
Place a sheet of nori (rough side up) on the bamboo mat. Depending on weather you like your rolls thick or thin, you can cut the sheet of nori in half lengthwise. I like ’em thick, so I use the whole sheet. Using your paddle, spoon some rice onto the sheet of nori, coating it to the ends. This is where your bowl of water comes in handy. I dip my wooden paddle in the water to moisten it a bit, so that the rice doesn’t stick to it as much and easily comes off onto the nori.Note that if you’re making regular makizushi (nori on the outside), leave about a 1/2 inch of the nori on top uncovered, so that it’s easier to seal. For uramaki (rice on the outside), spread the rice to the ends, putting a thicker layer of rice near the top to make sure none of the nori pokes out after you roll. Place your ingredients about 3/4 of the way down from the end of the nori sheet. If you put it right at the end it will be difficult to roll it up. I usually stack my cucumbers and crab first, then layer the avacado and masago on top. For Uramaki, you’ll have to flip the rice-covered nori over THEN place your ingredients on the nori side of the sheet before you roll (you can sprinkle toasted seseme seeds on the rice before you flip, or wait until after you roll it up).
Roll ‘Em, Baby
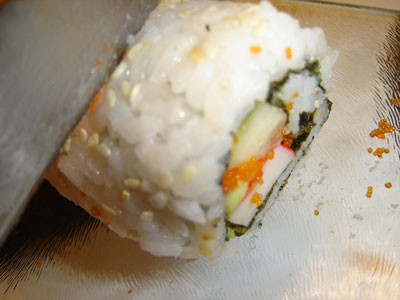
Very carefully, begin rolling your roll (lol, that sounds funny) from the side closest to your body. Make sure you don’t roll up the plastic wrap or bamboo sheet into the roll you’re making. Basically, you’re going to roll a bit (picking up the bottom of the nori and covering the part of the roll with the filling), and apply some pressure with the bamboo mat to keep things tightly intact. After you roll uramaki, you can roll it on some masago or toasted seseme seeds (so it sticks to the rice) for some extra flavour and presentation. For regular maki, make sure you wet the top edge of the exposed nori a bit, to seal in the edge of the roll.
Cut It
Using a sharp, wet knife, slice your sushi roll into about 6-8 pieces. I find that using a serrated knife helps with the cutting process (especially the nori), but as long as it’s a good, sharp knife it should cut the maki roll nicely.
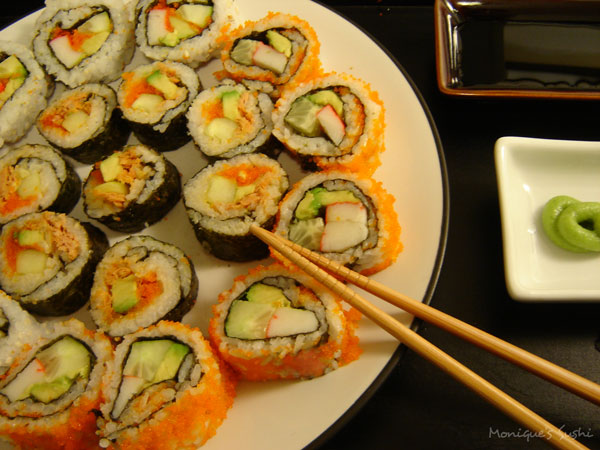
Present It
Sushi’s really all about presentation. I purchased some really nice sushi plates and condiment bowls from Winners (at a good price). I’m pretty sure you can find them at your local department store or Asian supermarket. Pour some soy sauce into a small bowl and add a bit of wasabi and gari if you like. Don’t forget the chopsticks.
Eat It
No explanation necessary. Enjoy!
Don’t worry if your sushi comes doesn’t come out right after the first few tries. It may take some practice to get it right. Try some different variations where fillings are concerned. If you’d like more info on how to make your own sushi, along with some advanced instructions, check out these helpful links:
I’ve been there a few weeks ago and I’m from The Netherlands so i should know how it would taste and I got a apple crumble pie and it was the best I’ve ever had little expesive but okay it was delicious!
 Why I don’t need it: I have a
  I should’ve gotten a PlayStation and

on August 11, 2016